As a user of home-computers you are liable to get confronted with loading
problems! Apart from faulty duplication of program masters, most loading
problems are caused by maladjustment of the recorder head. When the setting
is only a few degrees of (figure 1, in the back of this manual) the program
signals on the cassette do not or only partially reach your computer. With
the Head Alignment Kit you are able to precisely readjust the recorder head.
The Head Alignment Kit offers the main program, a special test program and a
screwdriver for fine-adjustment.
On the A-side of the cassette you will first find the main program-HAK, then
the test program-side A. On the B-side you'll first find the test program
side B and then the main program-HAK.
CLEANING THE RECORDING HEAD
---------------------------
Before you start adjusting the recorder head it is recommended to clean it
first. Press the PLAY-button of your recorder down; the head will appear.
Clean, for instance with a cotton bud dipped in alcohol.
LOADING THE PROGRAM CASSETTE
----------------------------
Insert the program cassette (label up) in the recorder. Rewind, then enter:
RUN"CAS:"
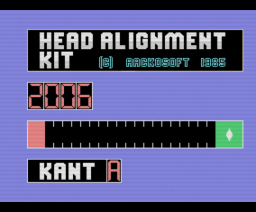
After loading the following will appear on your screen:
1 a counter
2 side "A"
3 a bar with one green and one red end, plus an arrow.
WHEN THE PROGRAM CASSETTE DOES NOT LOAD
---------------------------------------
When the recording head is badly adjusted, there is a possibility that even
the program cassette will not load. In this case you should place the Kit's
screwdriver carefully in the opening above the REWIND-button were the
adjustment screw is situated (see figure 2). Be sure to place the
screwdriver vertically on the screw (see figure 3). In most cases it is
easier to press the PLAY-key first; the recorder head and adjustment screw
will be just under the opening. Now try to turn the adjustment screw and
reload the program. Repeat this, until the correct display appears on the
main screen.
Note: Be carelul when using the adjustment screwdriver. Keepedd away from
magnetic fields (like in loudspeakers, t.v.). A magnetised screwdriver can
damage the recorder head. Pull the screwdriver out of the opening before
pressing any cassette recorder key.
ADJUSTING THE RECORDING HEAD
----------------------------
1. As soon as the main program is loaded you are able to adjust the recorder
head. While the cassette is running, carefully insert the screwdriver in the
opening above the REWIND-button (see former chapter). Turn the screw until
the arrow is in the green part ot the bar on your screen. The counter on the
screen has to exceed 2000. Turn the screwdriver several times slowly to the
left/right until the maximum number is reached.
2. Remove the screwdriver from the opening. Press . On the screen
a "B" appears. Reverse the cassette, rewind it and press PLAY. Now try to
get the arrow back in the green area again and allow the counter to reach
the highest amount possible. This demands some precision.
3. Remove the screwdriver. Press on so that again "A" appears and
reverse the cassette back to side "A". Forward the cassette to the test
program-side A and start the recorder. When the arrow is still on the
correct place, the head is now properly adjusted.
4. When the arrow has shifted, repeat the steps from 2. Always press before reversing the cassette. And again, for best result it is
important that the counter has the highest read- out possible.
Note 1: There is no signal on the header tape of the cassette!
Note 2: The test program side A is for "global" adjustment, side B for
fine-tuning, where after the test program side A is used for final control.